For lasting outdoor floors, choose a durable sealant meant for your patio material. Opt for UV and water-resistant options. Clean the surface well beforehand. Repair cracks and chips. Apply sealant evenly in small sections. Don’t overdo it! Proper prep is critical for resealing too. If haze appears, let it dry, lightly sand, and reseal. Tackle discoloration with a UV-resistant sealant. Personalize your patio with tinted or glossy finishes. Improve appearance while preserving durability. Train your patio for longevity by starting with the right sealant.
Choosing the Right Sealant
When selecting a sealant for your patio, prioritize durability over cost to ensure long-lasting protection. Choosing the right sealant is crucial for maintaining the integrity and appearance of your outdoor flooring. Look for sealants specifically designed for the material of your patio, whether it’s concrete, pavers, or stone. These sealants are formulated to provide the best protection against the elements your patio will face.
Opt for a high-quality sealant that offers resistance to UV rays, water, stains, and heavy foot traffic. While cost-effective options may be tempting, they often require more frequent reapplication, leading to higher costs in the long run. Investing in a durable sealant upfront will save you time and money on maintenance in the future.
Consider the finish you desire for your patio when selecting a sealant. Matte finishes offer a natural look, while glossy finishes provide a sleek appearance. Some sealants enhance the color of your patio material, bringing out its natural beauty. Choose a sealant that not only protects but also enhances the overall aesthetic of your outdoor space.
Before applying the sealant, ensure your patio surface is clean and dry. Proper preparation will allow the sealant to adhere effectively, maximizing its protective qualities.
Following these tips will help you choose the right sealant for your patio, ensuring long-lasting durability and beauty for years to come.
Preparing the Patio Surface
To prepare your patio surface for sealing, start by cleaning it thoroughly to remove any dirt, debris, or stains.
Next, inspect for any damages like cracks or chips that need repairing before applying the sealant.
Lastly, when you’re ready to seal, make sure to apply the sealant evenly across the entire surface for optimal protection and longevity.
Clean Patio Thoroughly
Before proceeding with patio sealing, ensure that the patio surface is thoroughly cleaned to maximize the effectiveness of the sealing process. Start by sweeping away any debris like leaves, dirt, and twigs. Use a pressure washer to remove stubborn dirt, grime, and any mold or mildew that may have accumulated. Pay special attention to corners and edges where buildup tends to occur.
After washing, allow the patio to dry completely before proceeding to the next step. This is crucial, as any remaining moisture could affect the adhesion of the sealant.
Once dry, inspect the surface for any remaining stains or spots. Use a suitable cleaner to treat these areas and ensure they’re completely removed.
Cleaning the patio thoroughly is essential for the longevity of the sealant and the overall appearance of your outdoor space. By taking the time to clean the surface properly, you’re setting the foundation for a successful patio sealing project that will protect and enhance your outdoor flooring for years to come.
Repair Any Damage
Inspect your patio surface for any cracks, chips, or other damage that may need repair before proceeding with the sealing process. Start by cleaning out any debris or dirt from the damaged areas using a brush or a pressure washer. Once the surface is clean, assess the extent of the damage.
For minor cracks or chips, consider using a concrete patching compound to fill in the imperfections. Make sure to follow the manufacturer’s instructions for the best results.
For larger cracks or areas with significant damage, you may need to contact a professional to evaluate and repair the patio surface properly. It’s crucial to address any existing damage before applying the sealant to ensure a smooth and even finish.
Taking the time to repair the damage now will help prevent future issues and prolong the lifespan of your patio surface. Remember, a well-maintained patio not only looks better but also enhances the overall durability of your outdoor flooring.
Apply Sealant Evenly
Ensure the patio surface is clean and thoroughly dried before applying the sealant evenly for optimal results. Start by sweeping away any debris or dirt, then wash the surface with a mild detergent and water. Allow the patio to dry completely before proceeding with the sealing process.
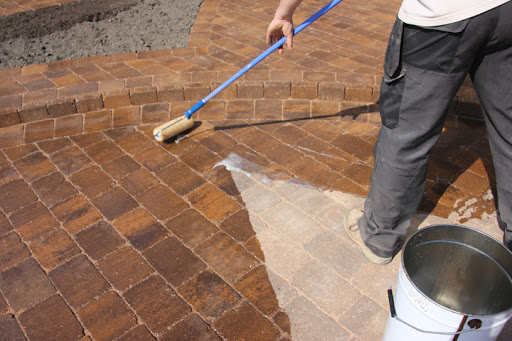
When applying the sealant, pour a small amount onto the patio surface and use a roller or brush to spread it evenly. Work in small sections to ensure thorough coverage and prevent any pooling or streaking. Make sure to follow the manufacturer’s instructions regarding drying times and the number of coats needed for adequate protection.
Avoid over-application of the sealant, as this can lead to a sticky residue or uneven finish. It’s better to apply multiple thin coats rather than one thick layer. Take care around edges and corners to ensure no areas are missed.
Applying the Sealant Properly
Proper application of the sealant is crucial for ensuring the longevity and effectiveness of your patio sealing efforts. To begin, make sure the surface is thoroughly cleaned and dry before applying the sealant. Any dirt or moisture left on the patio can interfere with the sealant’s ability to adhere properly.
When applying the sealant, use a paint roller or a pump sprayer for an even and consistent coat. Start from one end of the patio and work your way to the other, ensuring that the sealant is spread uniformly across the entire surface.
Avoid leaving puddles or thick patches of sealant as they can cause an uneven finish and reduce the effectiveness of the sealant.
Pay special attention to the edges and corners of the patio, as these areas are often more prone to wear and tear. Use a brush or a smaller tool to carefully apply the sealant in these hard-to-reach spots, ensuring that every part of the patio is adequately covered.
After applying the sealant, allow it to dry completely before walking or placing furniture on the patio. Follow the manufacturer’s instructions regarding drying times to ensure the sealant cures properly.
Curing Time and Maintenance
Allow the sealant on your patio to cure fully before resuming regular use and establish a maintenance routine for long-lasting protection. Curing time is crucial for the effectiveness of the sealant. Most sealants require around 24-48 hours to fully cure, but it’s best to follow the manufacturer’s specific recommendations.
During this curing period, it’s essential to keep the patio free from foot traffic, furniture, or any other objects that could disturb the drying process.
Once the sealant has fully cured, it’s time to implement a maintenance routine to ensure your patio remains in top condition. Regular maintenance not only keeps your patio looking its best but also extends the lifespan of the sealant.
Sweeping or using a leaf blower to remove debris regularly is a simple yet effective way to prevent dirt and grime from accumulating on the surface. For a deeper clean, washing the patio with a mild detergent and water can help remove stubborn stains.
Additionally, it’s recommended to inspect the patio periodically for any signs of wear or damage to the sealant. If you notice any areas where the sealant has worn off or is damaged, it’s essential to reapply the sealant promptly to prevent further deterioration.
Troubleshooting Common Sealant Issues
For effective patio sealing, addressing common sealant issues promptly is crucial to maintaining the integrity of your outdoor flooring. One common problem you may encounter is bubbling or blistering of the sealant. This issue often occurs due to improper application in hot or humid conditions. To troubleshoot this problem, you should carefully sand down the affected areas, remove the bubbled sealant, and reapply a new coat following the manufacturer’s guidelines.
Another frequent sealant issue is peeling or flaking, which can result from using an incompatible sealant type or not preparing the surface adequately. If you notice peeling or flaking, you must strip off the old sealant completely, clean the surface thoroughly, and reseal it using a compatible product.
If you observe white haze or cloudiness on the sealed surface, this could be due to moisture trapped under the sealant during application. To resolve this problem, you need to let the area dry completely, lightly sand the affected spots, and reseal the patio after ensuring it’s completely dry.
In cases where the sealant appears discolored or stained, this might be caused by mold, mildew, or UV exposure. To tackle this issue, clean the surface with a suitable cleaner, treat any mold or mildew, and apply a UV-resistant sealant to prevent future discoloration.
Enhancing the Look With Sealant Options
Addressing common sealant issues on your patio can lead to a more polished look and enhanced protection of your outdoor flooring.
When it comes to enhancing the appearance of your patio with sealants, you have a variety of options to choose from. One popular choice is a tinted sealant, which can add color to your patio while protecting against UV rays and water damage. This option allows you to customize the look of your outdoor space while maintaining its durability.
If you prefer a more natural look, a penetrating sealant might be the way to go. This type of sealant seeps into the pores of the concrete, brick, or stone, enhancing the natural beauty of the material without adding a glossy finish. Penetrating sealants are great for maintaining the authentic look of your patio while still providing necessary protection.
For those looking to add a glossy finish to their patio, a film-forming sealant is a suitable choice. This type of sealant creates a protective film on the surface of the patio, giving it a shiny appearance. Film-forming sealants are excellent for enhancing the vibrancy of colored concrete or stamped patterns, making your outdoor flooring truly stand out.
Frequently Asked Questions
Can I Walk on the Sealed Patio Immediately After Applying the Sealant?
Yes, you can walk on the sealed patio immediately after applying the sealant. It’s important to follow the manufacturer’s guidelines for drying times to ensure the sealant properly sets and provides long-lasting protection for your outdoor flooring.
How Often Should I Reseal My Patio for Optimal Protection?
You should reseal your patio every 1-3 years for optimal protection. This regular maintenance helps to maintain the integrity of the sealant and ensures your outdoor flooring remains durable and protected against the elements.
Is It Safe to Use a Pressure Washer on a Sealed Patio Surface?
You can use a pressure washer on a sealed patio surface, but be cautious. Use a low-pressure setting and hold the nozzle a good distance away to prevent damage to the sealant or the patio surface.
Can I Apply Sealant Over Existing Cracks and Imperfections on My Patio?
Yes, you can apply sealant over existing cracks and imperfections on your patio. However, it’s crucial to clean the surface properly and fill in any deep cracks before sealing to ensure a smoother and longer-lasting finish.
Will the Sealant Affect the Color or Texture of My Patio Surface?
Yes, sealant can slightly alter the color and texture of your patio surface. It may darken the color slightly and add a subtle sheen. Test in a small inconspicuous area first to ensure you are satisfied with the result.
Conclusion
In conclusion, by choosing the right sealant, properly preparing the patio surface, applying the sealant correctly, allowing for proper curing time, and maintaining the sealant, you can ensure long-lasting outdoor flooring for your patio.
Remember to troubleshoot any common sealant issues that may arise and consider enhancing the look with different sealant options.
With these tips in mind, your patio will be well-protected and look great for years to come.