Achieve a professional-grade epoxy flooring finish by following these expert tips and tricks. Choose a durable epoxy kit with clear instructions. Clean and prepare the subfloor meticulously. Mix epoxy resin and hardener accurately for a strong bond. Apply the base coat evenly and consider adding decorative flakes for a textured finish. Allow proper curing time before sanding and cleaning the surface thoroughly. Apply the top coat for protection and glossiness. Complete the process with buffing and polishing for a high-shine finish. For a flawless outcome, master each step carefully.
Choosing the Right Epoxy Kit
When selecting an epoxy kit for your DIY flooring project, it’s crucial to consider factors such as durability, coverage, and ease of application. You want your space to look amazing and last a long time, right? Well, choosing the right epoxy kit is the first step towards achieving that professional finish you desire.
First off, let’s talk about durability. You want a floor that can withstand the wear and tear of everyday life, whether it’s from foot traffic, furniture moving, or accidental spills. Look for epoxy kits that specifically mention high durability or industrial-grade strength. This will ensure your floor stays looking pristine for years to come.
Next, coverage is key. You don’t want to run out of epoxy halfway through your project, leaving you scrambling to get more and risking color discrepancies. Make sure to calculate the square footage of your floor space and choose an epoxy kit that provides enough coverage for that area, with a little extra, just in case.
Lastly, ease of application is vital for a smooth DIY experience. Opt for epoxy kits that come with clear instructions, all the necessary tools, and a user-friendly application process. This will make your project enjoyable and stress-free, giving you that sense of accomplishment and belonging to the DIY community.
Preparing the Subfloor
Begin by thoroughly cleaning the subfloor to remove any dirt, dust, or debris that could affect the adhesion of the epoxy coating. Use a broom, vacuum, and mop to ensure that the surface is free from any particles that could interfere with the epoxy application. If there are stubborn stains or grease spots, consider using a degreaser or a mild detergent to clean these areas effectively.
Next, inspect the subfloor for any cracks, holes, or imperfections. Fill in any gaps with a suitable filler and allow it to dry completely before proceeding. Smooth out the filled areas to create a level surface, as any unevenness can impact the final look of your epoxy floor.
Once the subfloor is clean and repaired, it’s crucial to check the humidity levels in the room. High humidity can prevent the epoxy from curing correctly, leading to potential issues with the finish. Use a hygrometer to measure the humidity and ensure it’s within the recommended range for epoxy application.
Lastly, if you’re applying epoxy over a concrete subfloor, consider using a primer to enhance adhesion. The primer will help the epoxy bond securely to the concrete, promoting a longer-lasting finish. Follow the manufacturer’s instructions carefully when applying the primer to achieve the best results.
Mixing Epoxy Resin and Hardener
When mixing epoxy resin and hardener, remember to maintain the proper ratio for a successful flooring application.
Ensure thorough mixing to achieve a uniform consistency and optimal curing.
These two key points are crucial for a durable and long-lasting epoxy floor finish.
Proper Resin-To-Hardener Ratio
Ensure you accurately measure the resin and hardener in the correct ratio to achieve a successful epoxy flooring application. The resin and hardener must be mixed in the precise proportions recommended by the manufacturer. Typically, this ratio is 1:1, meaning equal parts of resin and hardener should be combined. Deviating from this ratio can result in the epoxy not curing properly, leading to a sticky or soft finish that won’t provide the durable flooring surface you desire.
Maintaining the proper resin-to-hardener ratio is crucial for the chemical reaction that gives epoxy its strength and durability. Using too much hardener can cause the epoxy to cure too quickly, making it challenging to work with and potentially compromising its final strength.
Conversely, using too little hardener can result in the epoxy remaining tacky and not fully hardening.
Thorough Mixing Technique
For a successful epoxy flooring application, thoroughly mix the epoxy resin and hardener according to the manufacturer’s instructions. Proper mixing is crucial to ensure a strong bond and a smooth finish for your floors.
Start by pouring the resin into a clean mixing bucket, followed by the hardener. Use a stirring stick to combine the two components thoroughly. Make sure to scrape the sides and bottom of the bucket as you mix to ensure all parts are incorporated evenly.
While mixing, maintain a consistent pace to prevent introducing air bubbles into the mixture. Aim for a smooth, uniform consistency without any streaks or swirls. This process typically takes around 3-5 minutes, but follow the manufacturer’s guidelines for precise timing.
Applying the Base Coat
First, prep the floor surface by cleaning and etching it to ensure proper adhesion.
Next, mix the epoxy resin and hardener according to the manufacturer’s instructions.
Then, apply the base coat evenly using a roller or squeegee for a smooth finish.
Prep Floor Surface
To start preparing your floor surface for epoxy application, thoroughly clean and degrease the area to ensure a smooth base coat application. Begin by sweeping the floor to remove any dust, dirt, or debris. Use a degreasing cleaner and scrub brush to eliminate any oil, grease, or other contaminants that could interfere with the epoxy bonding properly to the surface. Rinse the floor thoroughly and allow it to dry completely before proceeding.
After cleaning, inspect the floor for any cracks, holes, or imperfections. Fill in any gaps with a suitable epoxy patching compound and allow it to cure according to the manufacturer’s instructions. Sand down rough spots or high points to create a level surface for the base coat application.
Once the floor is clean, smooth, and dry, you’re ready to apply the base coat of epoxy. This crucial step sets the foundation for the rest of the epoxy flooring process, so take your time and ensure a thorough and even application for a professional finish.
Mix and Apply
You can start the process of mixing and applying the base coat by carefully following the epoxy manufacturer’s instructions. Begin by wearing the appropriate safety gear, including gloves and goggles, to protect yourself. Ensure the area is well-ventilated to prevent inhaling harmful fumes. Mix the epoxy resin and hardener according to the specified ratio, typically 1:1, in a clean bucket. Use a drill with a mixing paddle attachment for thorough blending.
Once the base coat is mixed, pour it onto the floor in a ribbon pattern to ensure even coverage. Spread the epoxy using a squeegee or roller, working in small sections to prevent the product from drying too quickly. Be mindful of any edges or corners, ensuring they’re adequately coated. Allow the base coat to cure as per the manufacturer’s instructions before proceeding with the next steps in the epoxy flooring application process.
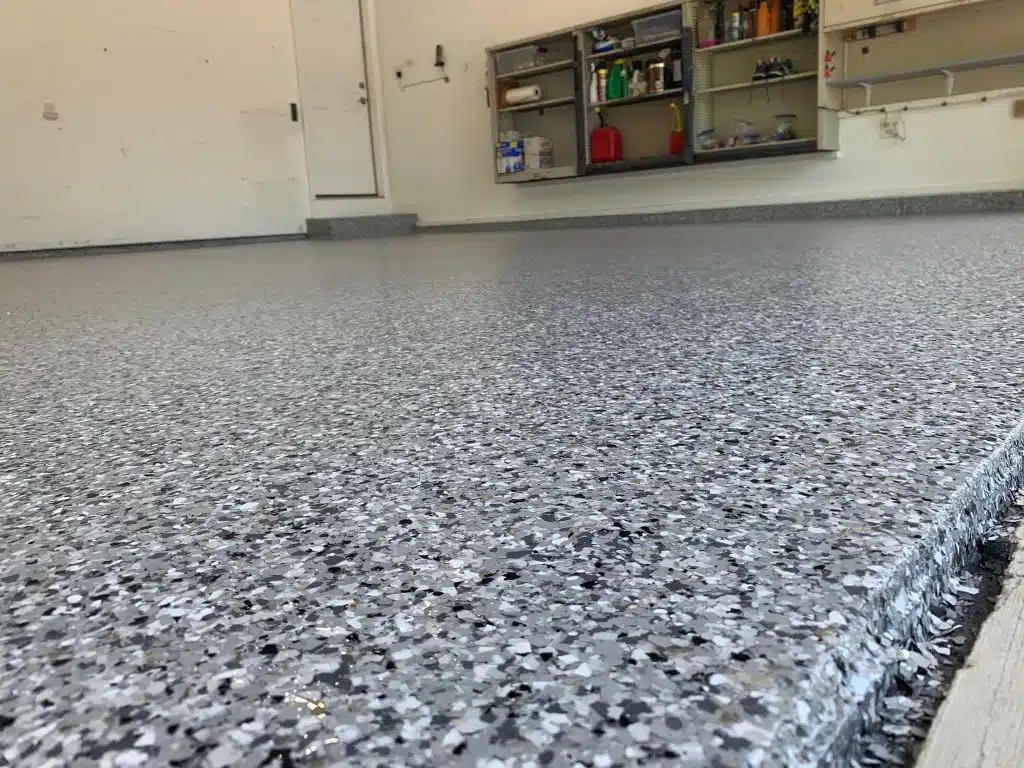
Adding Decorative Flakes (Optional)
Consider incorporating decorative flakes into your epoxy flooring for a personalized touch. Adding decorative flakes is a fantastic way to customize your floor and make it uniquely yours. These flakes come in a variety of colors and sizes, allowing you to create a floor that suits your style and preferences. By sprinkling these flakes onto the epoxy while it’s still wet, you can achieve a beautifully textured finish that not only looks great but also adds a touch of personality to your space.
When adding decorative flakes to your epoxy flooring, it’s essential to do so evenly and consistently. You want to make sure that the flakes are spread out uniformly across the entire surface to avoid clumping or uneven distribution. This will ensure a professional-looking finish that you can be proud of.
Additionally, consider the color scheme of your space when choosing the flakes to incorporate. Opt for colors that complement the overall aesthetic of the room to create a cohesive and inviting atmosphere.
Experiment with different combinations of flakes to find the perfect look for your epoxy flooring. Whether you prefer a subtle hint of color or a bold statement, adding decorative flakes allows you to express your creativity and make your space feel truly your own. So go ahead, sprinkle on those flakes, and watch your epoxy flooring transform into a personalized masterpiece.
Letting the Epoxy Cure
Once you have added decorative flakes to your epoxy flooring, the next step is to allow the epoxy to cure properly. This is a crucial part of the process to ensure a durable and long-lasting finish. Curing time can vary depending on the specific epoxy product you used, but typically it takes about 24 to 48 hours for the epoxy to fully cure.
During this curing period, it’s important to avoid walking on the surface or placing any heavy objects on it. This will help prevent any imperfections or damage to the epoxy finish. Make sure the area is well-ventilated to aid in the curing process.
While waiting for the epoxy to cure, resist the temptation to touch or inspect the surface constantly. Trust the process and allow the epoxy to set undisturbed. This patience will pay off in the end with a beautifully finished floor that will stand the test of time.
Once the curing time is complete, you can move on to the next steps in the process, such as sanding and cleaning the surface to achieve a smooth and polished look.
Sanding and Cleaning the Surface
To prepare the surface for the next steps, start by sanding and cleaning the epoxy flooring thoroughly. Sanding the surface helps to roughen it up a bit, allowing the new epoxy coat to adhere better. Use a floor sander with a fine-grit sandpaper to gently sand the entire surface. Be sure to wear a mask and protective eyewear to keep yourself safe from dust and debris.
After sanding, it’s crucial to clean the floor effectively. Sweeping and vacuuming the floor will remove any dust and dirt left from sanding. Follow up with a thorough cleaning using a mild detergent and water solution. Scrub the floor with a scrub brush or mop, ensuring all debris is removed. Rinse the floor with clean water and allow it to dry completely before proceeding.
Cleaning the floor not only removes dirt but also eliminates any contaminants that could affect the new epoxy coat’s adhesion. A clean surface is key to achieving a smooth and professional finish.
Take your time during this step to ensure the floor is spotless before moving on to the next phase. Your attention to detail will pay off in the final result, providing you with a beautiful epoxy floor you can be proud of.
Applying the Top Coat
Prepare your epoxy flooring surface by ensuring it’s clean and dry before applying the top coat. A top coat is crucial for protecting your epoxy floor and giving it a glossy, professional finish.
Once you have completed the base coat and allowed it to cure according to the manufacturer’s instructions, it’s time to move on to the next step.
Before applying the top coat, make sure the temperature in the room is ideal for the epoxy to cure properly. Check the instructions on your epoxy kit for the recommended temperature range.
Mix the top coat epoxy thoroughly following the manufacturer’s guidelines. Pour the top coat onto the floor in a ribbon pattern to ensure even coverage.
Using a high-quality roller with a medium nap, spread the top coat evenly over the floor surface. Work in small sections to prevent the epoxy from drying too quickly. Be mindful of any bubbles that may form and use a brush or roller to smooth them out immediately.
Allow the top coat to cure for the recommended time before walking on it.
Buffing and Polishing
To achieve a brilliant shine on your epoxy floor, it’s crucial to focus on polishing. By buffing the surface, you can ensure a smooth and flawless finish.
Let’s explore how these simple steps can elevate the look of your flooring.
Shine With Polishing
How can you achieve a high-gloss finish on your DIY epoxy flooring through buffing and polishing?
Once your epoxy coating has fully cured, it’s time to bring out that gorgeous shine. Buffing and polishing play a crucial role in achieving that professional look you desire for your floors.
To begin, ensure the surface is clean and free of any debris before starting the buffing and polishing process. Use a high-quality polishing compound that’s specifically designed for epoxy surfaces.
Apply the compound using a buffing pad attached to a buffer machine. Work in small sections, moving the buffer in a back and forth motion to evenly distribute the polish.
As you buff, you’ll start to see the high-gloss finish emerge. Keep the buffer moving at a steady pace to avoid any swirl marks or uneven shine.
Once you’ve completed the entire floor, use a clean microfiber cloth to remove any excess polish and reveal the stunning shine of your DIY epoxy flooring.
Buff for Smoothness
Achieve a smooth finish on your DIY epoxy flooring by buffing and polishing with a high-quality compound and a buffer machine. Buffing helps to remove any imperfections or unevenness in the epoxy surface, resulting in a sleek and professional look.
Start by attaching a polishing pad to your buffer machine and applying a small amount of compound to the pad. Work in small sections, moving the buffer in a back and forth motion, overlapping each pass slightly for even coverage.
Keep the buffer moving at a consistent speed to avoid creating swirl marks or uneven spots. As you buff, you’ll notice the surface becoming smoother and more lustrous.
Take your time and pay attention to detail, especially around edges and corners where buildup can occur. Once you have completed buffing the entire floor, wipe it down with a clean microfiber cloth to remove any leftover compound residue.
Buffing your epoxy flooring not only enhances its appearance but also provides a protective layer that helps to prevent scratches and wear over time.
Enjoy the satisfaction of stepping back and admiring your beautifully smooth and glossy epoxy floor.
Maintaining Your Epoxy Floor
Wondering how to ensure your epoxy floor stays in top condition for years to come? Maintaining your epoxy floor is crucial to preserving its durability and aesthetic appeal. Here are some tips to help you keep your epoxy floor looking pristine.
Firstly, regular cleaning is key to maintaining your epoxy floor. Sweep or dust mop daily to remove debris that can scratch the surface. For a deeper clean, use a soft-bristle brush or a mop with a gentle cleanser and warm water. Avoid harsh chemicals as they can damage the epoxy finish.
Secondly, to prevent scratches and dents, place felt pads under furniture legs and use rugs or mats in high-traffic areas. This simple step can significantly prolong the life of your epoxy floor.
Additionally, it’s essential to avoid dragging heavy objects across the floor. Whenever you need to move furniture or other hefty items, use a dolly or get someone to help you lift them. This will prevent unnecessary wear and tear on your epoxy floor.
Lastly, perform routine inspections to check for any signs of damage or wear. Addressing issues promptly can prevent them from escalating and help maintain the beauty of your epoxy floor for years to come.
Frequently Asked Questions
Can Epoxy Flooring Be Installed Over Existing Tiles?
Yes, you can install epoxy flooring over existing tiles. It’s essential to ensure the tiles are clean, dry, and in good condition. Proper preparation is key for a successful application, leading to a durable and professional finish.
Is Epoxy Flooring Suitable for Outdoor Use?
Yes, epoxy flooring can be suitable for outdoor use, offering durability and resistance to weather elements. However, proper installation and maintenance are crucial to ensure longevity and a professional finish that enhances your outdoor space.
How Long Should I Wait Before Moving Furniture Back?
After applying epoxy flooring, wait at least 24 to 48 hours before moving furniture back. This time allows the epoxy to cure properly, ensuring a durable finish. Patience ensures your flooring looks professional and lasts longer.
Can Epoxy Be Applied Over Radiant Heating Systems?
Yes, you can apply epoxy over radiant heating systems. It’s crucial to ensure the system is turned off and the surface is cool before application. Following proper steps will help you achieve a seamless finish that lasts.
How Do I Fix Bubbles or Imperfections in the Epoxy?
To fix bubbles or imperfections in the epoxy, gently heat the affected area with a heat gun or hairdryer to release trapped air. Then, use a blowtorch or heat gun to carefully remove any remaining bubbles, ensuring a smooth finish.
Conclusion
Now that you’ve followed these tips and tricks for DIY epoxy flooring, you’re on your way to achieving a professional finish in your home or garage.
Remember to choose the right epoxy kit, prepare the subfloor properly, and take your time during each step of the process.
With a little patience and attention to detail, you can enjoy a durable and stylish epoxy floor for years to come.
Good luck!