
So, you think you’ve got what it takes to master the art of epoxy flooring installation? Well, my friend, it’s not as simple as slapping some epoxy on the floor and calling it a day. Oh no, there’s a whole world of surface preparation, mixing, and curing that awaits you. But fear not, for with the right knowledge and a steady hand, you can achieve the glossy, seamless finish of your dreams. So, buckle up and prepare to embark on a journey filled with tips, tricks, and techniques that will leave you itching to dive into the world of epoxy flooring installation.
Surface Preparation
Before you begin the epoxy flooring installation process, it is crucial to properly prepare the surface. Surface preparation is a critical step that ensures a successful and long-lasting epoxy flooring application. To achieve optimal results, there are several important steps you need to follow.
Firstly, you must thoroughly clean the surface to remove any dirt, dust, or debris. Sweep or vacuum the area to eliminate loose particles, and then use a degreaser to remove any grease or oil stains. It is essential to have a clean and dry surface before moving forward.
Next, you need to assess the condition of the surface. Check for any cracks, holes, or uneven areas. These imperfections should be repaired and leveled before applying the epoxy coating. Fill in any cracks or holes with a suitable epoxy filler and use a leveling compound to smooth out any uneven areas.
After the repairs are done, it is time to etch the surface. This step involves using an acid or a mechanical grinder to create a rough texture on the surface. Etching is important as it helps the epoxy coating adhere better to the floor. Follow the manufacturer’s instructions carefully when etching the surface.
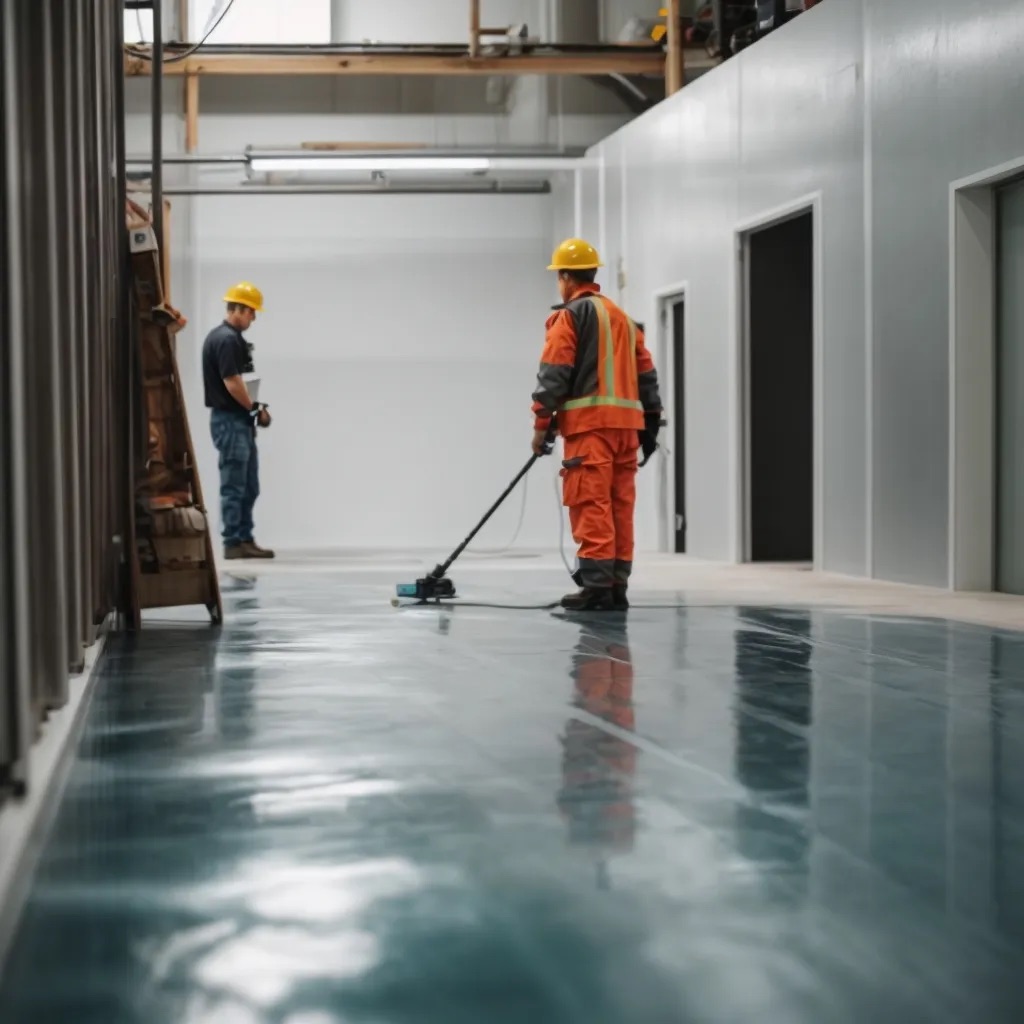
Once the surface is properly prepared, it is ready for the epoxy application. Remember to read and follow the instructions on the epoxy product you are using. Apply the epoxy coating evenly and smoothly, ensuring complete coverage of the entire surface.
Choosing the Right Epoxy Flooring System
To ensure a successful epoxy flooring installation, it is crucial to carefully select the appropriate epoxy flooring system for your specific needs and requirements. Choosing the right epoxy flooring system involves considering factors such as the type of substrate, expected level of foot or vehicle traffic, chemical exposure, and desired aesthetic appearance.
Firstly, you need to assess the substrate on which the epoxy flooring will be applied. Different epoxy flooring systems are designed for various substrates, including concrete, wood, or metal. Concrete substrates are the most common, and they require epoxy systems specifically formulated for concrete bonding.
Secondly, consider the level of foot or vehicle traffic that the epoxy flooring will endure. High-traffic areas like warehouses or parking garages require more durable epoxy systems with higher compressive strength and abrasion resistance. On the other hand, low-traffic areas like residential garages may require a less robust epoxy system.
Chemical exposure is another critical consideration. If the epoxy flooring will be exposed to chemicals, such as in industrial settings or laboratories, a chemical-resistant epoxy system should be chosen. These systems are designed to withstand the corrosive effects of various chemicals and prevent damage to the flooring.
Lastly, aesthetic appearance plays a role in selecting the right epoxy flooring system. Epoxy systems are available in a variety of colors, finishes, and patterns. It is essential to choose a system that complements the overall design and desired look of the space.
Mixing and Applying the Epoxy
Start by preparing the epoxy mixture according to the manufacturer’s instructions, ensuring precise measurements of the resin and hardener. This step is crucial in achieving a successful epoxy flooring installation. Improper mixing can lead to incomplete curing and weak adhesion, resulting in a subpar finish.
To begin, gather the necessary tools and materials, including a clean mixing container, a stir stick, and safety equipment such as gloves and goggles. Make sure the workspace is well-ventilated to avoid inhaling any fumes.
Carefully pour the correct ratio of resin and hardener into the mixing container. It is essential to follow the manufacturer’s instructions precisely, as different epoxy formulations may require different ratios. Using a scale or measuring cup, weigh or measure the components accurately to ensure a proper chemical reaction.
Next, thoroughly mix the resin and hardener together. Use the stir stick to combine the two components, making sure to scrape the sides and bottom of the container to incorporate any unmixed material. Stir in a slow, deliberate motion to avoid introducing air bubbles into the mixture.
Once the epoxy is thoroughly mixed, let it sit for a few minutes to allow any air bubbles to rise and dissipate. During this time, it is important to avoid over-agitation, as this can introduce more air into the mixture.
After the resting period, the epoxy is ready for application. Use a roller or brush to evenly spread the epoxy onto the prepared surface. Work in small sections, ensuring complete coverage and avoiding pooling or drips. If desired, multiple coats can be applied to achieve the desired thickness and finish.
Remember to follow the recommended cure time before subjecting the epoxy flooring to foot traffic or heavy loads. Following these steps will help you master the art of epoxy flooring installation, resulting in a durable and visually stunning floor.
Adding Decorative Elements (Optional)
You can enhance the aesthetic appeal of your epoxy flooring by incorporating decorative elements, if desired. Adding decorative elements to your epoxy flooring can transform an ordinary surface into a visually stunning masterpiece. There are several options available to you when it comes to adding decorative elements, including flakes, metallic pigments, and stencils.
One popular choice is the use of flakes. These flakes, also known as vinyl chips or color flakes, are available in a wide range of colors and sizes. They are scattered onto the wet epoxy surface, creating a speckled or mottled appearance. The flakes not only add visual interest but also provide texture and improve traction, making your floor safer.
Another option is the use of metallic pigments. These pigments create a glossy, metallic finish that gives the floor a luxurious and modern look. The pigments are mixed with the epoxy resin and then applied to the floor. The result is a stunning floor that reflects light and adds depth to the space.
If you want to add a more intricate design to your epoxy flooring, stencils are a great choice. Stencils allow you to create patterns, logos, or even custom designs on your floor. Simply place the stencil on the floor and apply the epoxy over it. Once the epoxy has cured, remove the stencil to reveal the design.
When adding decorative elements to your epoxy flooring, it is important to follow the manufacturer’s instructions and use the recommended products. Proper preparation and application techniques are crucial to achieving the desired results. It is also important to consider the overall design and style of the space to ensure that the decorative elements complement the existing decor. By incorporating decorative elements into your epoxy flooring, you can create a unique and visually appealing surface that will impress anyone who sees it.
Curing and Maintaining Your Epoxy Floor
Curing and maintaining your epoxy floor is essential for ensuring its long-lasting durability and aesthetic appeal. Once the epoxy coating is applied, it is important to allow it to cure properly. Curing refers to the process of the epoxy hardening and reaching its maximum strength. This typically takes around 24 to 48 hours, but it’s crucial to follow the manufacturer’s instructions for the specific curing time.
During the curing process, it is important to avoid any foot or vehicle traffic on the floor. This will prevent any damage or imperfections from occurring. Additionally, it is essential to maintain the appropriate temperature and humidity levels in the space to ensure proper curing. Following these guidelines will help to ensure that your epoxy floor is strong, durable, and long-lasting.
Once the epoxy floor has cured, regular maintenance is necessary to preserve its pristine appearance. Sweeping or vacuuming the floor regularly will remove any dirt, dust, or debris that can scratch or dull the surface. For more stubborn stains or spills, a mild detergent and water can be used to clean the floor. It is important to avoid any abrasive cleaners or scrub brushes, as they can damage the epoxy finish.
To prevent any potential damage to the epoxy floor, it is recommended to use protective mats or pads under heavy furniture or equipment. This will help to distribute the weight evenly and prevent any indentations or scratches. Additionally, it is important to avoid dragging or sliding heavy objects across the floor.


